Monday, February 28, 2011

Girls Dress Refashion

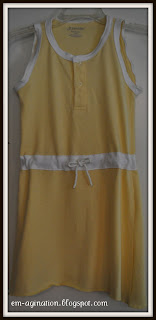
Spring is coming, Spring is coming, Spring is coming, never mind that we got snow and had well below freezing temperatures this week. I just know that it will be here before I know it so I am preparing for it now. I couldn't sleep the other night so I decided to do a little Internet window shopping and came across this little ditty which caught my eye, not only because it was cute but because I thought, I could make that. The inspiration dress is by Juicy Couture and while very cute at $88.00 it is definitely more than I am willing to spend on a girls dress. Time to use my "em-agination" and figure out how to make this myself.
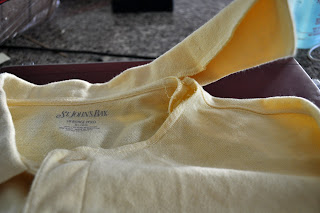
I decided that this dress was a perfect candidate for a clothing refashion. "Clothing Refashion?" you ask, well let me explain. A clothing refashion is when you take and existing piece of clothing that is not longer wanted and turn it into a different item that is. In this case I took an X-large men's polo shirt and refashioned it into a girls dress.

Here is how I did it, not really a tutorial just an explanation of the process. First off, I began by removing the collar of the shirt using a seam ripper.
Second, I found an existing tank top that my daughter owned to use as a pattern for the top of the dress, because it didn't have the skirt, I had to free hand an a-line skirt on the bottom. I wish I had have done a more straight skirt rather than the a-line just because that would have recreated the inspiration dress a little better. For the pattern I used a paper grocery bag that I cut apart.
Once the pattern was drawn and cut out I folded my polo shirt in half and pinned my patten down and cut it out. I left the shoulder seams intact just because it was one less seam to sew.
At this point I sewed up the two side seams and added bias tape made from a ribbed knit around the neck and arm holes.

I then cut a 2 1/2 inch strip of white ribbed knit for the belt. I then ironed the edges over 1/4 inch and added 2 button holes for the tie. Then pin this around the waist of your dress and top stitch around the entire waist of your dress.
 Once the belt is top stitched into place I attached two 8 inch pieces of cording/rope to a length of elastic just smaller than my daughter's waist. I then fed the cording and elastic through one of the button holes in the belted middle of the dress using a safety pin attached to the cording to pull the entire length of elastic around the dress and out the other button hole.
Most of the time, I try to use and existing hem when refashioning clothing just because it makes for one less thing to do, unfortunately, this shirt was just a little to long to do that with so I had to cut off the existing hem and create a new one. for this hem, I used an overlock stitch to hem the dress, (similar to the look of  what a serger would produce) and left it at that. I however may go back and create a traditional hem to this dress because it still fills a little long on my daughter and my husband says it looks unfinished. We will see, depends on if my daughter will really wear it, right now, she is a little luke warm on the dress. Hopefully when we get warmer weather, she will warm to wearing it. I think it will also look very cute with an added white t-shirt underneath. Here are a few more pics of my daughter being a goof in her dress, please feel free to link back to this post but please don't use my photos without asking, especially one's with my children in them.
And a final comparison of the inspiration dress (on left) and my dress (on right), definately not perfect recreation but that is not what I was going for, I simply used the Juicy dress as a jumping off point, all in all, I am satisfied.

Wednesday, February 23, 2011

Bibs for your Baby


I know I have been posting a lot of baby stuff recently, kind of ironic considering my youngest is almost 6 but it just so happens that I know quite a few people who are having or have recently had a baby. I remember that when my kids were babies, bibs were always in short supply, they are constantly getting soiled with food or soaked through with drool. I know gross but you know what I mean. Knowing this I decided that a few handmade bibs would be a perfect little gift for my cousin who recently had a little boy. I however needed a bib pattern so I googled free bib patterns and came up with this very easy pattern from Chickpea Sewing Studio, a great first project if you are a beginning sewer. I tell you I love the Internet for free patterns, what a great resource. I however have hated sewing with knit fabrics because they always stretch and pucker and I have hated how they turned out but I read a tip recently about using a walking foot when sewing with knits. Can I tell you I have never been so excited, the knit fabric used for the bibs hardly stretched,  there was no puckering and everything laid very flat. With this little trick, I can not wait to sew with knits again, I will have to see what I can come up with using my "em-agination."

Tuesday, February 22, 2011

Kids can be an Author and an Illustrator

The kids had an extra long weekend because of President's Day which means a lot of questions like, "What can I do, I am bored?" Out comes the art supplies which sometimes means a few minutes of crafting and sometimes means a few hours, this time it meant a few hours with the outcome of a few very cute books.
                        

For inspiration, we used Ed Emberley's Fingerprint Drawing Book. We absolutely love this book and it get used often. This book also makes a great gift when packaged with a multi-colored stamp pad and a sketch pad, a go to gift in our house if we don't have time to make a handmade gift.


My daughter used her "em-agination" much more than I did and chose to write a couple of original stories "Little, Little Elephant" and "Mouse Visits the Circus" (still a work in progress), I simply chose to illustrate one of my kids favorite little poems "5 Little Monkeys". If your kids are bored, encourage them to write and illustrate their own books, you might be surprised by what they come up with. Here are the books we came up with.

Monday, February 21, 2011

Spice Up Your Life


I've said it before, I am frugal. Not only am I frugal when it comes to crafting but in most areas of my life. In our house we have been following the the Dave Ramsey "Total Money Makeover" plan for the last 1 1/2 years and this plan requires budgeting for everything. Our budget for groceries every month is $600 which feeds a family of 5, breakfast, lunch and dinner. I've been told by some that this is low, I don't know if it is or isn't, it just works for us but it does require a little "em-agination" to make the money stretch. One of the ways I have found to cut down on grocery costs is to buy spices in the bulk section of our local grocery store. I can get the same amount you pay $2-$3 for in the little plastic jars in the bulk section for 40-50 cents. All the little bags from the bulk section though make for a very messy spice cupboard.

So I set out to fix that when I found some small glass jars at Cost Plus World Market. These jars were .99 cents a piece but they were running a sale, buy 2 get the third 1 free which made the jars .67 cents a piece, right up my alley, cheap and much more appealing than those little plastic spice containers. Using my favorite crafting tool, I labeled the jars and filled them up with my bulk spices. A nice and easy craft that helps with organization which is not one of my strong points.

Saturday, February 19, 2011

Front Door Decor

I love the look of a wreath on a front door, or wreaths as in our case, I just think they are so inviting. I however am very cheap (I prefer frugal but most people call me cheap) and hate the cost attached to most wreaths so what's a girl to do but create her own. Can you guess what these are made of?


Well if you guessed brown paper lunch sacks and a couple of pieces of scrapbook paper and a Styrofoam wreath form, you would be correct.  In total, each of these wreaths probably cost me about $1.25, I got the wreath form from the Dollar tree for $1.00 and I had the scrapbook paper in my stash. Off the subject but, have you ever been in the dollar store and heard someone ask how much something is? It makes me laugh every time.
The base of the wreath is made by cutting out circles from brown paper lunch sacks that are scrunched up around a pencil and glued around a wreath form. I found the tutorial on another blog called MaryJanes & Galoshes. I only covered the front half of my wreath since the back would be against the door and no one would see.  For the flowers, I again used me favorite crafting tool that my cute hubby bought me awhile back and one I will mention a lot here because it is so great, it is called the Silhouette Craft Cutter (and no, I am not getting paid for mentioning this product, I just love, love, love, it.) Basically my Silhouette cut out the individual layers of flowers and then I glued, smooshed and rolled the layers until I liked how they looked. Not to bad looking for paper huh?

I added the little welcome greeting to the door also but I feel like my other door looks naked now. So my question to you is what should I do, leave it plan or add something to the other door. My daughter thinks I should add something like, "to our home" I just am not sure, what do you think? Use your Em-agination and come up with another saying to help me out.

Thursday, February 17, 2011

Baby Hat with a Giant Flower (oh yeah)

To go with the itty bitty baby dress I decided that a hat was needed, not just any hat but a hat with a giant flower...they are all the rage right now and oh so cute. I used this little tutorial from Make it and Love it to make this hat but instead of the flower shown in the tutorial I made what I call a ruffle flower.
                                  
 This flower is really easy to make. Start by cutting a long rectangle of fabric, for this flower I cut a 2" by 18" strip of fabric but you can make it any size really, cut your rectangle longer if you want a fuller flower, cut it shorter if you want a less full flower.

Then sew three sides of the rectangle, the 2 short sides and one 18" side with a zig-zag stitch or a serger if you have one (stitch shown in red), this will help to keep the fabric from fraying.
On the side you haven't sewn you are going to sew a large basting/ruffle stitch to do this, set your machine's stitch length as high as it will go, my machine goes up to a 5 or five stitches per inch. You then are going to turn your tension up as high as it will go, my machine goes up to a 9. When you begin to sew your stitch, do not lock your stitch or reverse your stitch because you want to be able to pull on your thread ends when you are done to tighten your ruffles (again shown in red).
With the machine tension set to its highest setting and the stitches being so long, the fabric will being to automatically ruffle your fabric some. However to make the flower you want the ruffles to be very tight causing the fabric to begin to curl around itself in a sort of spiral.
When your ruffle is starting to spiral you will naturally see how if you lay the spirals on top of each other a flower will form, you can adjust how the layers lay to get a perfect flower.
Now using a needle and thread, tack all the layers together to prevent the flower from coming apart and attach to anything you wish, a hat, a pin, a headband, a belt, a scarf. Try layering several colors together for a multicolored flower or adding a jewel to the center for added flare, you are only limited by your "Em-agination."

Tuesday, February 15, 2011

Baby Needs a Dress

I don't know about you but I love to give and receive handmade gifts. It is true, they do take more time than going to a store and picking something out but I think they just show how much you care about someone when you take the time to make them something. It doesn't hurt either that I can usually make something for cheaper than I can buy it and it gives me an excuse to be creative. This weekend was one of those times when I needed a gift for a baby shower and I had been wanting an excuse to make this dress so off to Jo-ann's I went to find the perfect fabric for an Itty Bitty Baby dress and this is what I came up with.
As you can see I modified the pattern just a bit, I thought that the bows on the shoulders may be a bit uncomfortable for a little baby so I opted to cut off one of the flaps from the front of the dress and add buttons and button holes to the back flaps. This dress is quite easy to sew and only took about an hour from start to finish. I will definitely be making this dress again, maybe for my own little girl who isn't so little anymore. Stay tuned because this little number also has a cute little hat to go with it, more on that in the next post.


Monday, February 7, 2011

Faux Stained Glass for Kids

My daughter has always said that when she is older, she wants to be an artist and I believe she will, she loves arts and crafts that much! This craft that Kylee and I did together came about because she and my son were going to a birthday party in which no gifts were requested but I felt bad showing up at a birthday party empty handed and figured a handmade gift made by my seven-year-old would be okay. Inspired by a piece of art she had brought home from school that looked like stained glass, using and overhead transparency and permanent markers, we decided that we would make this for the birthday boy and girl but put  a twist of our own in this project.

Here is what you will need:
  • Clear acetate (overhead transparency)
  • Permanent markers in various colors
  • Letter stencils (we used my favorite crafting tool, the Silhouette Craft Cutter to cut out vinyl letters, you can also free hand your letters if you are confident enough, I am not.)
  • Picture frame in whatever size you choose to make.
Here is how we made them:
  1. cut your transparency down to the size you have chosen.
  2.  cut out the name you have chosen either using a stencil or your Silhouette and apply to your transparency. (again you could  free hand the name if you have nice hand writing which I don't.)
  3. using a black sharpie, just draw squiggles all  over your transparency, don't be afraid to cross over your lines it will be just fine and in fact I think it looks better that way.
  4. 


  5. after your lines are drawn, fill in each individual shape crated by the lines you just created using lots of different colors.


  6. we allowed ours to dry overnight so that the colors don't smear.     


  7. after they dried overnight we mounted them into cheap frames using just the frame and the glass so that the light could shine through like stain glass. To do this I applied mounting tape to the frame which is essentially a double sided tape made out of foam, often used to give dimension to scrapbook pages or cards. 


Here are the finished faux stained glass frames...its a really great project to do with your kids, send me a picture, I would love to see it your interpretation.                                                

The frame is white just like the one above, picture is just a little dark.

~ Emily